Prep: 60 mins
Cook: 25 mins
Total: 85 mins
Servings: 12 servings
Yield: 24 cookies
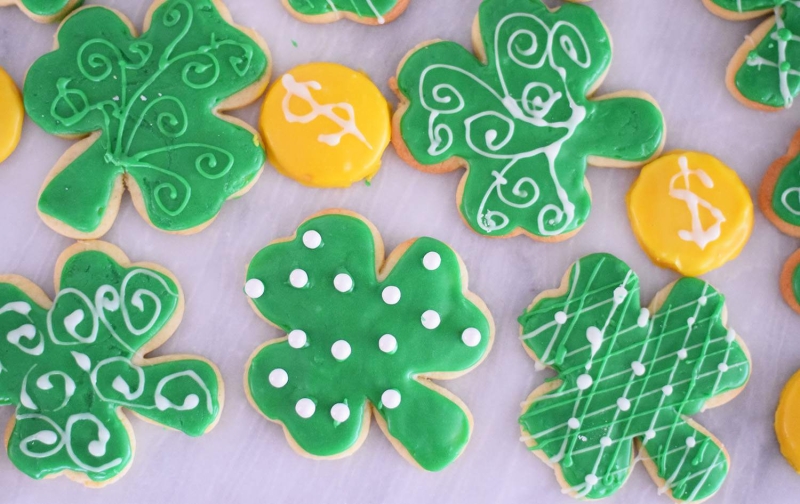
Nothing says St. Patrick's day quite like shamrocks. Their shape is a classic symbol of this traditional Irish holiday — each of the three leaves representing the holy trinity. So what could be a better way to celebrate than making these cute shamrock-shaped sugar cookies?
Irish or not, we're sure you can get excited about celebrating this holiday with these adorable green sugar cookies.
Ingredients
-
2/3 cup butter, softened
-
3/4 cup granulated sugar
-
1/2 teaspoon orange peel, grated
-
1/2 teaspoon pure vanilla extract
-
1 large egg
-
4 teaspoons milk
-
2 cups all-purpose flour, sifted
-
1 1/2 teaspoons baking powder
-
1/4 teaspoon salt
For the Royal Icing:
-
2 cups plus 2 tablespoons confectioners' sugar
-
1 1/2 tablespoons meringue powder
-
3 tablespoons milk
-
Green food coloring, optional
-
Yellow food coloring, optional
-
White food coloring, optional
-
Edible pearls, optional, for decoration
-
Sprinkles, optional
Steps to Make It
-
Gather the ingredients.
-
Add the softened butter, sugar, orange peel, and vanilla extract to the bowl of a stand mixer. You can also use a regular medium-sized bowl and a hand mixer. Blend until the ingredients are creamed together.
-
Add the egg and beat until light and fluffy.
-
Add the milk to the mixture and blend again. Scrape down the sides of the bowl as needed.
-
Sift together the dry ingredients and gradually add them to the creamed mixture. After the dough is combined, divide it in half, wrap in plastic wrap and chill for at least one hour.
-
Preheat the oven to 375 F.
-
Place the dough on a lightly floured surface and roll out to about 1/8-inch thick.
-
Cut out the dough using the shamrock cookie cutter. If you are making the coins, we recommend using a small round cookie cutter. Add the cookies to a greased or parchment-lined cookie sheet.
-
Bake for about 6 to 8 minutes or until set. Keep a careful eye on them while baking so they do not get over-baked. You don't want them to brown.
-
Roll out dough scraps into another sheet and repeat cutting out the shapes.
-
Allow the cookies to cool slightly on the cookie sheets and then transfer them to a cooling rack to finish cooling.
-
While the cookies are cooling, prepare the royal icing. Beat together the powdered sugar, meringue powder, and milk until completely combined. Separate the icing into three bowls.
-
In one bowl, add 2 tablespoons of powdered sugar. This will be the icing for edging the cookies. Place the icing in a piping bag with a small hole attachment.
-
In the second bowl add the green food coloring and mix until completely combined. Place the icing in a piping bag with a larger hole opening attachment.
-
In the third bowl add yellow food coloring. Add the icing to a third piping bag with a smaller opening.
-
Edge all of the cookies with the white icing. Flood each cookie with the green icing, using a toothpick to help spread the icing to the edges. Flood the coins with the yellow icing.
-
Allow the cookies to completely dry — it should take 1 to 2 hours. Use the edging icing to add designs to the tops of the cookies and to attach edible pearls and sprinkles to the cookies.
-
You can also thicken the rest of the green and yellow food coloring with more powdered sugar and use that icing to decorate the cookies as well. Allow them to dry and then serve!
| Nutrition Facts | |
|---|---|
| Servings: 12 | |
| Amount per serving | |
| Calories | 318 |
| % Daily Value* | |
| Total Fat 11g | 14% |
| Saturated Fat 7g | 34% |
| Cholesterol 43mg | 14% |
| Sodium 197mg | 9% |
| Total Carbohydrate 53g | 19% |
| Dietary Fiber 1g | 2% |
| Total Sugars 36g | |
| Protein 3g | |
| Vitamin C 0mg | 1% |
| Calcium 49mg | 4% |
| Iron 1mg | 6% |
| Potassium 41mg | 1% |
| *The % Daily Value (DV) tells you how much a nutrient in a food serving contributes to a daily diet. 2,000 calories a day is used for general nutrition advice. | |