Prep: 0 mins
Cook: 30 mins
Chill: 60 mins
Total: 90 mins
Servings: 36 to 49 servings
Yield: 1 8-inch pan
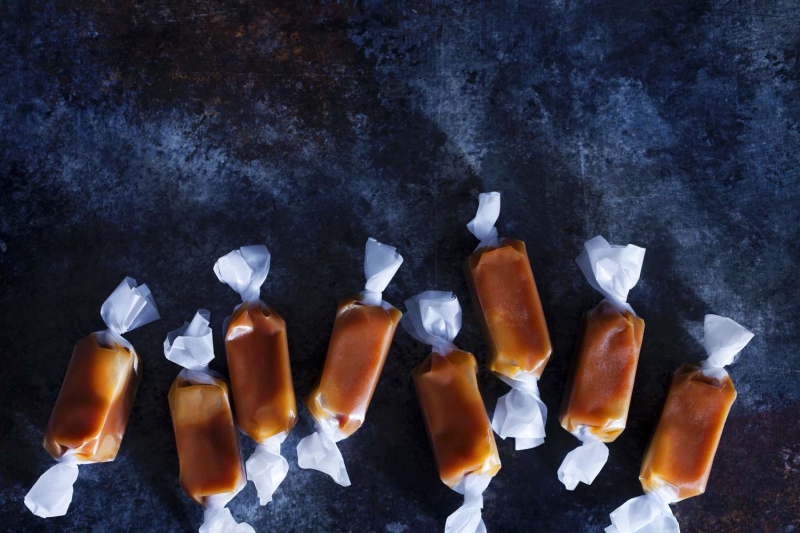
Vegan caramels are chewy and gooey, with a hint of cardamon and the mild aroma and flavor of vanilla extract. If you're vegan and it has been a while since you've had a good caramel, or the vegan versions are just too pricey, make your own. These caramels are perfectly silky and sticky, soft in texture, and have a nice buttery flavor.
As in any candy-making process, keep kids and pets out of the kitchen, wear a protective apron, have silicone gloves at hand, and always wear shoes to avoid any slips and burns when handling hot caramel. For best results, use an accurate candy thermometer.
Wrap these caramels in festive paper to make small gift boxes for friends and family. Homemade caramels are a very special gift that vegans and non-vegans will love.
Ingredients
-
1 cup sugar
-
1 cup vegan coffee creamer, or coconut cream
-
1/2 cup light corn syrup
-
1/4 cup (4 tablespoons) vegan margarine
-
1 tablespoon pure vanilla extract
-
1/2 teaspoon ground cardamom, optional
Steps to Make It
-
Gather the ingredients.
-
Grease an 8-inch square pan and set aside. This size will yield a thick caramel, so if you want to make them thinner, go a size up to a 9-inch pan.
-
In a heavy saucepan (at least 6 inches tall) combine the sugar, coffee creamer or coconut cream, and corn syrup. Bring to a simmer over medium heat, stirring constantly with a wooden spoon, until the sugar is completely dissolved, or about 5 minutes.
-
Add your margarine and stir until the mixture reaches a boil, about 5 more minutes. Once the caramel boils, stop stirring.
-
Let the mixture boil, but keep an eye on it so that it doesn't boil over. Check the temperature with a candy thermometer until it reaches 250 F.
-
When the mixture reaches the right temperature (after a good 20 minutes of steady boiling) immediately stir in the vanilla and cardamom if using. Quickly pour the caramel into the prepared pan.
-
Let the candy cool at room temperature for 10 minutes, then chill in the fridge for about an hour. Once the candy is firm, cut it into squares. Freeze for 5 minutes before cutting to make the mixture less sticky.
-
Wrap the candy in waxed paper and store it in the refrigerator. The little squares will not melt at room temperature but they get pretty soft if kept at warmer temperatures. Store in a cool, dry place up to 1 month.
-
Enjoy!
Tips
If you don’t have a candy thermometer, follow these steps to check your candy:
- Place a glass of water in the fridge before you start cooking.
- Once the candy has been at a steady boil for at least 15 minutes, take your wooden spoon and dip the very tip of it into the top of the bubbly mixture. The syrup should stick to the spoon like a thick pudding when it is about done.
- Grab a spoonful of the caramel and quickly drop it into the cold glass of water. When it is dropped in the water, it should resemble a caramel candy, firm but pliable. This is referred to as the “firm-ball” stage.
- You will know the candy is ready when the ball is firm enough not to flatten when you remove it from the glass, but it needs to be sufficiently pliable to flatten if you give it a little squeeze.
- If the conditions above are met, your candy is ready to go into the greased pan.
| Nutrition Facts | |
|---|---|
| Servings: 36 to 49 | |
| Amount per serving | |
| Calories | 56 |
| % Daily Value* | |
| Total Fat 2g | 2% |
| Saturated Fat 1g | 6% |
| Cholesterol 0mg | 0% |
| Sodium 4mg | 0% |
| Total Carbohydrate 10g | 4% |
| Dietary Fiber 0g | 0% |
| Total Sugars 10g | |
| Protein 0g | |
| Vitamin C 0mg | 0% |
| Calcium 1mg | 0% |
| Iron 0mg | 0% |
| Potassium 7mg | 0% |
| *The % Daily Value (DV) tells you how much a nutrient in a food serving contributes to a daily diet. 2,000 calories a day is used for general nutrition advice. | |