Prep: 20 mins
Cook: 25 mins
Ferment and Rise Time: 17 hrs
Total: 17 hrs 45 mins
Servings: 6 to 12 servings
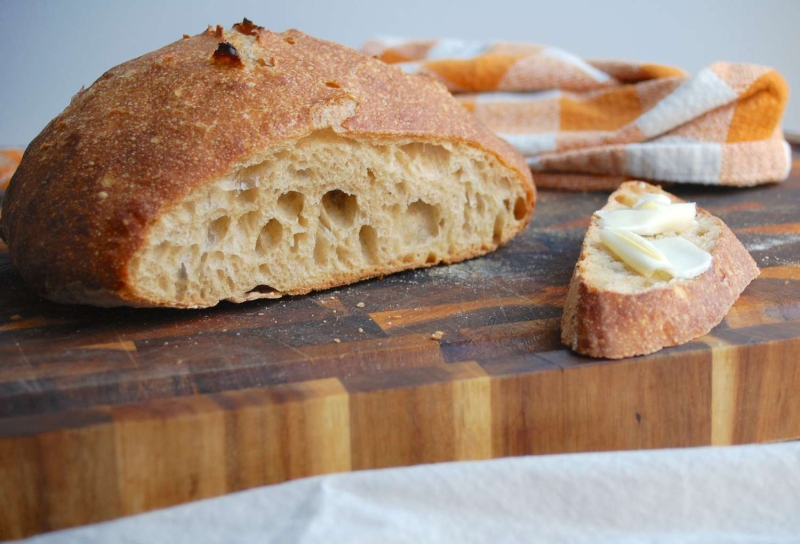
A type of ancient grain, spelt has been consumed by human beings since before agriculture was widely practiced. Since then, spelt has been overshadowed by its more industry-friendly cousin, wheat. While the proteins in spelt aren’t as accommodating to the rigors of mass production, they do just fine in the environment of the home kitchen. That’s one of many reasons why spelt bread is worth baking, another reason being the taste and texture: spelt bread is nutty and slightly sweet, with a soft and tender crumb.
This recipe uses a “poolish,” which is simply a way of fermenting a portion of the flour before mixing the final dough. It adds flavor and gives the dough more strength to trap the carbon dioxide created by the yeast. Next, while wheat generally benefits from vigorous mixing or kneading, spelt is a bit more delicate, which is why this method calls for a short mixing time, followed by a series of folds. Spelt bread also tends to dry out a bit faster than wheat bread, so the hydration of this dough is a bit higher in order to compensate. Folding this wetter dough can be tricky, so if you’re new to handling bread dough, you may want to learn about the dough-folding process.
In order to achieve a nice spring and crackling crust, the dough is baked in a preheated Dutch oven instead of a loaf pan. Just be careful when transferring the dough as the pot will be very hot. All of the measurements in this recipe are in grams as weighing the ingredients when baking is the best and most accurate method.
Ingredients
For the Poolish:
-
80 grams white spelt flour
-
10 grams whole spelt flour
-
90 grams water
-
1 pinch instant yeast
For the Dough:
-
160 grams white spelt flour
-
20 grams whole spelt flour
-
95 grams water
-
5 grams kosher salt
-
1 pinch instant yeast
-
Brown rice flour, for dusting
Steps to Make It
Make the Poolish
-
Gather the ingredients.
-
Weigh the ingredients into a container with a lid. Mix to combine, cover, and leave to ferment at a temperature of 65 to 70 F for 12 to 16 hours.
Make the Dough
-
Gather the ingredients.
-
Once the poolish has fermented, weigh the ingredients for the dough into a roughly 2 1/2 quart mixing bowl. (You want to end up with a dough temperature of about 75 F, so if it’s very cold or very warm in your environment, you may want to compensate by using slightly warmer or cooler water.)
-
Add the poolish and mix with a spoon until well-combined. Cover the bowl.
-
After about 45 minutes, fold the dough. Repeat 2 more times at 45-minute intervals for a total of 3 folds.
-
About 45 minutes after the final fold—roughly 3 hours after mixing—prepare a cutting board with a good dusting of flour. Dust your countertop with flour and invert the bowl so the dough falls gently onto the floured countertop. Quickly and carefully fold the edges of the dough into the center, flip the loaf so the seams are on the bottom, and place the loaf onto the prepared board. Cover the loaf without touching the dough (a large inverted bowl or Tupperware container works well). Allow the dough to rise for a final 45 minutes.
Bake the Bread
-
With about 20 minutes to go in the last rise, put a 5-quart cast-iron Dutch oven with a lid into the oven and preheat it to 500 F.
-
At the end of the final rising period, the oven and cast-iron pot should be fully preheated. Gather 2 dough scrapers and a sheet of aluminum foil large enough to cover the top of the Dutch oven. Remove the pot from the oven (using oven mitts).
-
With a dough scraper in each hand, carefully slide the scrapers under the loaf from either side and transfer the loaf to the cast-iron pot. Cover the pot with the foil and place the preheated lid on top. Return the pot to the oven. Bake for 12 minutes, then remove the lid and foil. Bake until the surface of the loaf is a deep brown, another 12 to 15 minutes.
-
Remove the loaf to a cooling rack. Allow it to fully cool before slicing.
-
Serve and enjoy.
Tips
- It's important to add the correct amount of water to achieve the ideal texture when the bread is baked. Too little water will make for a dense and dry dough, and too much water will prevent the dough from rising.
- Be sure to mix the dough properly. The first few minutes of mixing are crucial and should not be too brief, but also not too lengthy; 3 to 4 minutes is ideal for combining the ingredients completely.
- Getting the dough into the hot cast-iron pot can be a little challenging. The best method involves using two dough scrapers to lift the dough and set it inside the pot, but if you don’t feel comfortable getting that close to piping-hot cast iron, you could use oven mitts, lift the dough on a large piece of parchment, or make a peel out of a flexible cutting board. Feel free to invent your own way—just be careful not to burn yourself.
| Nutrition Facts | |
|---|---|
| Servings: 6 to 12 | |
| Amount per serving | |
| Calories | 88 |
| % Daily Value* | |
| Total Fat 1g | 1% |
| Saturated Fat 0g | 1% |
| Cholesterol 0mg | 0% |
| Sodium 164mg | 7% |
| Total Carbohydrate 18g | 7% |
| Dietary Fiber 3g | 9% |
| Total Sugars 2g | |
| Protein 4g | |
| Vitamin C 0mg | 0% |
| Calcium 7mg | 1% |
| Iron 1mg | 6% |
| Potassium 97mg | 2% |
| *The % Daily Value (DV) tells you how much a nutrient in a food serving contributes to a daily diet. 2,000 calories a day is used for general nutrition advice. | |